

-
Posts
791 -
Joined
-
Last visited
-
Days Won
68
About Guy Fawkes

- User Group: Administrators
- Rank: Proficient
- Member ID: 1
- Content Count: 791
- Content Post Ratio: 1.18
- Reputation: 91
- Achievement Points: 4970
- Number Of The Days Won: 68
- Joined: 08/30/23
- Been With Us For: 671 Days
- Birthday: April 13
- Last Activity:
12 Followers


About Guy Fawkes
- Birthday April 13
Recent Profile Visitors
46938 profile views


Guy Fawkes's Achievements
")


-
a fresh update will be coming soon. of course this version was tested. there will be a problem with certificates. but everything can be solved
-
Как выбрать лучший VPN сервис? В 2025 все чаще люди задумываются о своей безопасности в интернете, сохранности своих данных, приватности. Даже просто получение доступа к привычным онлайн сервисам иногда требует изобретательности. Использование VPN сервиса может снять часть этих забот. Конечно, не все VPN одинаковы и хочется использовать лучший. На что же следует обратить внимание при выборе? Выбор VPN сервиса в 2025 году требует учета множества факторов, поскольку рынок продолжает развиваться, а требования пользователей к безопасности, скорости и удобству использования увеличиваются. Основные критерии, которые помогут выбрать лучший сервис: 1. Приватность и защита данных Прежде всего, VPN должен обеспечивать высокий уровень конфиденциальности. Обратите внимание на политику отказа от логов. Это означает, что провайдер не будет хранить записи о вашей активности в сети. Также важен уровень шифрования. 2. Скорость и стабильность соединения Одна из возможных проблем при использовании VPN — это замедление интернет соединения. Поэтому важно выбирать сервисы с высокими скоростями и минимальной задержкой. Современные VPN используют серверы с низкой загруженностью, распределенные по всему миру, что помогает обеспечить стабильное соединение даже при высоких нагрузках. Если высокая скорость интернета для вас особенно важна, то стоит задуматься о приобретении платной версии VPN. 3. Географическое разнообразие серверов Чем больше серверов в разных странах, тем выше возможностей обойти географические ограничения и получить доступ к контенту, заблокированному в вашей стране. Если, например, вы планируете использовать VPN для стриминга видео или доступа к зарубежным сайтам, наличие серверов в нужных регионах будет преимуществом. 4. Совместимость с устройствами и браузерами Проверьте, поддерживает ли VPN все устройств, которые вы планируете подключать: ПК, смартфоны, планшеты и смарт ТВ. Некоторые сервисы предлагают специальные приложения для различных платформ, что упрощает настройку и использование. Также если вы планируете установить VPN в браузере, то убедитесь, что выбранный провайдер предоставляет расширения для того браузера, который вы предпочитаете. 5. Дополнительные функции Некоторые VPN предлагают такие дополнительные возможности, как автоматическое отключение при потере соединения (Kill Switch). дополнительные опции повышают общую безопасность использования сети. 6. Стоимость и тарифные планы Стоимость VPN-сервиса должна быть оправдана качеством предоставляемых услуг. Многие провайдеры предлагают гибкие тарифы с возможностью оплаты за месяц или год. Стоит также обратить внимание на наличие пробных периодов и гарантий возврата денег. 7. Отзывы и репутация Прежде чем подписываться на выбранный VPN, изучите отзывы реальных пользователей и экспертов. Это поможет вам оценить, насколько надёжен провайдер и какие потенциальные проблемы могут возникнуть в процессе использования. Подводя итог Выбор лучшего VPN в 2025 году должен основываться на сочетании безопасности, скорости и удобства, с учетом ваших индивидуальных нужд и предпочтений. Обратите ваше внимание на vpn.webcluster.org, который соответствует всем перечисленным критериям, заботится о вашей безопасности и позволит вам комфортно использовать любые ресурсы в интернете, как раньше. На сайте действует реферальная программа, если зарегистрируетесь по ссылке то "+ вам в карму"! https://webcluster.org/aff.php?aff=1
-
yes it is good, visually, convenient, reliable. we just haven't tested it with version 8. it may work but it needs to be tested. I'll try to test it when I have time.
-
5, 6, 7 under vmware there are practically no solutions at all that is why I personally switched to proxmox
-
It will work! There are no alternatives anyway. There is nothing to update it with yet. As soon as there is a fresher version, I will post it!
-

Version v3.1.4 - nulled
0 downloads
Run your own live chat hosted server. Modern, fast and optimised for all devices. The only thing you have to do is Marketing. Cloud Chat 3 Server comes with a Live Chat Server, Sign Up page, Administration panel and an included ticketing/news system. All you need is included. Cloud Chat 3 – SaaS – Live Support Chat Business is a robust software-as-a-service solution designed to elevate your customer support and engagement capabilities. This feature-rich platform offers a range of tools to facilitate real-time communication, ensuring a seamless and efficient interaction between businesses and their customers. Explore the extensive list of features below: Real-time Live Chat Multi-Channel Support Chat Widget Customization Chat History and Archives Visitor Tracking Proactive Chat Invitations File Sharing Canned Responses Emoji and GIF Support Chatbot Integration User Authentication Multi-Operator Chat Departmental Routing Offline Messages Customer Information Capture Screen Sharing Ticketing System Knowledge Base Integration Mobile App for Operators Visitor Analytics Customizable Chat Forms Multi-language Support SSL Encryption Integration with CRM Systems Customizable Branding User Roles and Permissions Notification Settings API Integration White-label Solution 24/7 Customer Support Cloud Chat 3 – SaaS – Live Support Chat Business empowers businesses to provide exceptional customer support and foster real-time engagement, offering a comprehensive suite of features to enhance communication and satisfaction.4.99 EUR -
View File Cloud Chat 3 - Fully SaaS Live Support Chat Run your own live chat hosted server. Modern, fast and optimised for all devices. The only thing you have to do is Marketing. Cloud Chat 3 Server comes with a Live Chat Server, Sign Up page, Administration panel and an included ticketing/news system. All you need is included. Cloud Chat 3 – SaaS – Live Support Chat Business is a robust software-as-a-service solution designed to elevate your customer support and engagement capabilities. This feature-rich platform offers a range of tools to facilitate real-time communication, ensuring a seamless and efficient interaction between businesses and their customers. Explore the extensive list of features below: Real-time Live Chat Multi-Channel Support Chat Widget Customization Chat History and Archives Visitor Tracking Proactive Chat Invitations File Sharing Canned Responses Emoji and GIF Support Chatbot Integration User Authentication Multi-Operator Chat Departmental Routing Offline Messages Customer Information Capture Screen Sharing Ticketing System Knowledge Base Integration Mobile App for Operators Visitor Analytics Customizable Chat Forms Multi-language Support SSL Encryption Integration with CRM Systems Customizable Branding User Roles and Permissions Notification Settings API Integration White-label Solution 24/7 Customer Support Cloud Chat 3 – SaaS – Live Support Chat Business empowers businesses to provide exceptional customer support and foster real-time engagement, offering a comprehensive suite of features to enhance communication and satisfaction. Submitter Guy Fawkes Submitted 05/30/25 Category Scripts
-
View File Цой. История рок-звезды в буквах и картинках Год издания: 2024 Автор: Бояринов Денис Иллюстратор: Шишова Мария Жанр или тематика: Биографии певцов и музыкантов Издательство: Альпина Паблишер ISBN: 978-5-9614-9392-4 Серия: Искусство в буквах и картинках Язык: Русский Формат: PDF/FB2/EPUB/RTF Качество: Издательский макет или текст (eBook) Интерактивное оглавление: Да Количество страниц: 65 Описание: «Группа крови», «Мы ждем перемен», «Звезда по имени Солнце», «Дерево», «Место для шага вперед», «Мы хотим танцевать», «Когда твоя девушка больна», «Мама, мы все тяжело больны», «Кукушка» Эти песни хотя бы раз в жизни слышал каждый. Группа «Кино» стала символом эпохи перемен, самой популярной группой 1980–1990-х. Их песни слушают, поют, на них делают каверы, по ним учат аккорды. Имя лидера группы знают все, даже если никогда не слушали рок. Виктор Цой ― поэт и музыкант, актер и художник, легенда и кумир миллионов. Человек, чья музыка будет звучать всегда. «Цой. История рок-звезды в буквах и картинках» – иллюстративный нонфикшн, в котором из отдельных эпизодов истории группы «Кино» и жизни Виктора Цоя складывается картина больших перемен, и для каждого она получается своей. Эта книга – собирательный образ, метафора эпохи, рассказ о кумире поколений, который понравится и подросткам, и взрослым. Всем, кто хотя бы раз в жизни подпевал уличным музыкантам, пел на кухне «Пачку сигарет» (про «самолет с серебристым крылом»), а может, и сам учился играть песни группы «Кино». Как часто бывает у Цоя, «моментальный снимок» неприглядного, бесприютного быта превратился в нечто большее – чуть ли не метафору обреченности человека перед судьбой. Submitter Guy Fawkes Submitted 05/28/25 Category E-Books RU
-

0 downloads
Год издания: 2024 Автор: Бояринов Денис Иллюстратор: Шишова Мария Жанр или тематика: Биографии певцов и музыкантов Издательство: Альпина Паблишер ISBN: 978-5-9614-9392-4 Серия: Искусство в буквах и картинках Язык: Русский Формат: PDF/FB2/EPUB/RTF Качество: Издательский макет или текст (eBook) Интерактивное оглавление: Да Количество страниц: 65 Описание: «Группа крови», «Мы ждем перемен», «Звезда по имени Солнце», «Дерево», «Место для шага вперед», «Мы хотим танцевать», «Когда твоя девушка больна», «Мама, мы все тяжело больны», «Кукушка» Эти песни хотя бы раз в жизни слышал каждый. Группа «Кино» стала символом эпохи перемен, самой популярной группой 1980–1990-х. Их песни слушают, поют, на них делают каверы, по ним учат аккорды. Имя лидера группы знают все, даже если никогда не слушали рок. Виктор Цой ― поэт и музыкант, актер и художник, легенда и кумир миллионов. Человек, чья музыка будет звучать всегда. «Цой. История рок-звезды в буквах и картинках» – иллюстративный нонфикшн, в котором из отдельных эпизодов истории группы «Кино» и жизни Виктора Цоя складывается картина больших перемен, и для каждого она получается своей. Эта книга – собирательный образ, метафора эпохи, рассказ о кумире поколений, который понравится и подросткам, и взрослым. Всем, кто хотя бы раз в жизни подпевал уличным музыкантам, пел на кухне «Пачку сигарет» (про «самолет с серебристым крылом»), а может, и сам учился играть песни группы «Кино». Как часто бывает у Цоя, «моментальный снимок» неприглядного, бесприютного быта превратился в нечто большее – чуть ли не метафору обреченности человека перед судьбой.Free -

Инфраструктурная платформа на основе Kubernetes
Guy Fawkes replied to Guy Fawkes's topic in IT Courses
it follows that if you don't speak Russian - you don't need it! course in Russian! -
Invision Community how to disable "Important Update" notification message: Go to your Admin Control Panel (ACP). Navigate to Themes > Your Theme > Advanced Settings. In the Custom CSS section, add the following code: /* Hide the upgrade notification banner */ .cNotificationList { display: none !important; } Save your changes This will hide the banner on the frontend for all users.

-
--Updated to version 4.7.0
-
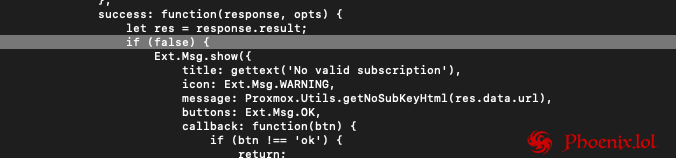
To Disable Proxmox VE Subscription Notification You must connect SSH your Proxmox VE server and perform the following actions: cp /usr/share/javascript/proxmox-widget-toolkit/proxmoxlib.js /usr/share/javascript/proxmox-widget-toolkit/proxmoxlib.js.bak nano /usr/share/javascript/proxmox-widget-toolkit/proxmoxlib.js ctrl+w (search): if (res === chenge it to: if (false) { and run in console: systemctl restart pveproxy Enjoy!
-
View File HostBilling - Web Hosting Billing & Automation Software HostBilling V2 is live now, Check more here- https://www.cloudonex.com/blog/hostbilling-v2-is-live-now HostBilling is a self-hosted alternative to WHMCS & hostbilling.io makes it so easy to manage your web hosting and digital service agency business. The robust features automate the whole life cycle of your customers. It is designed with powerful automation features to help you sell more & keep your clients happy. Billing Automation Save time by creating recurring invoices. Recurring invoice automatically generates the same data with the new date and invoice status. Create professional-looking invoices and accept online payments quickly. Paypal, Stripe, Braintree, authorize.net are integrated built-in. Any local payment gateway can be integrated upon request. Send automatic payment reminders whose invoices are due. Generate quotes/estimates; your customers can review the quotes and accept them online. Domain Registration & Hosting Plans View the WHOIS information by Performing a WHOIS lookup for any domain on-demand. HostBilling has a built-in Domain WHOIS lookup with 100+ extensions. Check domain availability using real-time polling of WHOIS services and place domain registration orders. Create Web Hosting Plans from the Backend and group them to show a beautiful Pricing page in your client portal. Cpanel Integration Plesk Integration DirectAdmin Integration - DirectAdmin Integration is available now as free plugin with the purchase of Hostbilling. Hestia Integration - Hestia Integration is available now as free plugin with the purchase of Hostbilling. Vesta Cp Integration - Vesta Cp Integration is available as free plugin with the purchase of Hostbilling. Powerful Support Desk HostBilling helps you run your Digital Agency Business efficiently. It has a support ticketing system to offer customer support. Allow your customer to create support tickets from the customer portal. You can create departments and separate similar tickets based on responsibilities. It supports file attachments for additional context. Track and assign tickets to staff for consistency and smooth management. Help your customer to help themselves with knowledge base articles. Shopping Cart Sell your services to your customers with the e-commerce interface. Customers can view your services without creating an account. The shopping cart system allows your customer to add an item then sign in or sign up to place the order. Productivity Tools Stay productive with productivity tools like calendars and tasks. Share files with your customers and allow your customer to upload files. Self Service Client Portal With HostBilling, customers will have a sleek and powerful self-service client portal from where they can manage every aspect of their domain registration and buy hosting plans from you. The organized client portal will increase your brand awareness, and the easy checkout system will increase your sales and boost your company’s growth rapidly. Payment Gateways Following payment gateways are available built-in with the system Paypal Stripe Braintree Authorize.net HostBilling - Web Hosting Billing & Automation Software - 1 The following payment gateway plugins are available which can be bought from our store Square for the USA, Canada Mollie for the Netherlands, Europe Paystack for Nigeria Robokassa for Russia PayUMoney for India CCAvenue for India Foloosi for UAE Adyen for Europe Vivawallet for Europe Razorpay for India WidePay for Brazil Paytm for India Payhere for Sri Lanka Mercadopago for Brazil Bluesnap SSLCommerz for Bangladesh Submitter Guy Fawkes Submitted 05/11/25 Category Scripts
-
Version 2.0.1 Nulled
1 download
HostBilling V2 is live now, Check more here- https://www.cloudonex.com/blog/hostbilling-v2-is-live-now HostBilling is a self-hosted alternative to WHMCS & hostbilling.io makes it so easy to manage your web hosting and digital service agency business. The robust features automate the whole life cycle of your customers. It is designed with powerful automation features to help you sell more & keep your clients happy. Billing Automation Save time by creating recurring invoices. Recurring invoice automatically generates the same data with the new date and invoice status. Create professional-looking invoices and accept online payments quickly. Paypal, Stripe, Braintree, authorize.net are integrated built-in. Any local payment gateway can be integrated upon request. Send automatic payment reminders whose invoices are due. Generate quotes/estimates; your customers can review the quotes and accept them online. Domain Registration & Hosting Plans View the WHOIS information by Performing a WHOIS lookup for any domain on-demand. HostBilling has a built-in Domain WHOIS lookup with 100+ extensions. Check domain availability using real-time polling of WHOIS services and place domain registration orders. Create Web Hosting Plans from the Backend and group them to show a beautiful Pricing page in your client portal. Cpanel Integration Plesk Integration DirectAdmin Integration - DirectAdmin Integration is available now as free plugin with the purchase of Hostbilling. Hestia Integration - Hestia Integration is available now as free plugin with the purchase of Hostbilling. Vesta Cp Integration - Vesta Cp Integration is available as free plugin with the purchase of Hostbilling. Powerful Support Desk HostBilling helps you run your Digital Agency Business efficiently. It has a support ticketing system to offer customer support. Allow your customer to create support tickets from the customer portal. You can create departments and separate similar tickets based on responsibilities. It supports file attachments for additional context. Track and assign tickets to staff for consistency and smooth management. Help your customer to help themselves with knowledge base articles. Shopping Cart Sell your services to your customers with the e-commerce interface. Customers can view your services without creating an account. The shopping cart system allows your customer to add an item then sign in or sign up to place the order. Productivity Tools Stay productive with productivity tools like calendars and tasks. Share files with your customers and allow your customer to upload files. Self Service Client Portal With HostBilling, customers will have a sleek and powerful self-service client portal from where they can manage every aspect of their domain registration and buy hosting plans from you. The organized client portal will increase your brand awareness, and the easy checkout system will increase your sales and boost your company’s growth rapidly. Payment Gateways Following payment gateways are available built-in with the system Paypal Stripe Braintree Authorize.net HostBilling - Web Hosting Billing & Automation Software - 1 The following payment gateway plugins are available which can be bought from our store Square for the USA, Canada Mollie for the Netherlands, Europe Paystack for Nigeria Robokassa for Russia PayUMoney for India CCAvenue for India Foloosi for UAE Adyen for Europe Vivawallet for Europe Razorpay for India WidePay for Brazil Paytm for India Payhere for Sri Lanka Mercadopago for Brazil Bluesnap SSLCommerz for BangladeshFree